Tuesday, November 29, 2011

K2P2 Bulky Weight Pit Bull Keyhole Scarf Pattern!! FREE!!!

you can see strings of yarn that still need to be woven in, sorry....

sunlight streaming in through the sliding glass door...sorry

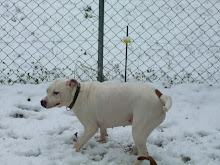
not the right angle, lots of movement and blur, sorry...

UPDATE!!:  No, these are not pictures of a giant Pit Bull modeling a hand-knit scarf they are pictures of a silly Yellow Lab modeling  the hand-knit scarf above mentioned Pit Bull refused to wear this morning for pictures.  I won't even tell you about the huge pee-pee puddle that resulted in the trying on of the scarf!!!  =(  UGH!  This is too large for Cade Brooke although she was a sweetheart and let me put it on her and take a few pictures.  You can see the large gap above the keyhole which is not what you want and wouldn't be there on Chico!  Also, the tails are a little too long for her as well.  I could fold this in half and tuck both ends in through the loop of the fold and this would be the perfect size for her, may just do that and let Chico shiver!

Yes, this is a pattern but more of a method.  I'll give you the numbers I used but if you don't have a giant whimpy baby Pit Bull you will have to use the METHOD instead of the PATTERN to adjust for your doggie.

First I measured around Chico's neck and got 17.5"  I'm going to add two inches to that so I need the area wrapped around his neck to be 19.5" long.  Yes, yarn is stretchy but you don't want it too tight or the scarf is uncomfortable and your pooch is just going to wrestle it off.  FAIL!  On the other hand, if you make it too loose so that there is a gap between creature and nice warm scarf, it will get hung on something, pulled at by doggie pals, paws and legs all akimbo, you get the picture.  This scarf needs to FIT.

I used US size 15 (10 mm) single point bamboo needles and Lion's Brand Homespun in a sapphire blue and chocolate brown.  No tags available but I do remember the brand.  This is a highly textured bulky weight yarn so the ribbing pattern wasn't important.  If you were to use a non-textured yarn like Lion Brand Thick and Quick, the ribbing would show and needs to start with a Knit2 and end with a Knit2.  More on this later.

To determine the width of your scarf, measure your dog's neck.  How wide do you want it?  I actually started casting on and just placed the needle against his neck since he was laying in my lap when I started this.  I decided I liked the look at 6" wide which was 20 stitches.  Like I stated above, this was a Knit2, Purl2 across and I ended in a Purl2 but that didn't matter with the textured yarn.  For a smooth yarn I would have taken it up or down by 2 so that I could start with a Knit2 and end with a Knit2. 

Cast on desired number of stitches.  (20 for my example scarf).
Row 1: Knit 2, Purl 2, Knit 2, Purl 2, Knit 2, Purl 2, Knit 2, Purl 2, Knit 2, Purl 2.  Turn.
Row 2: Knit 2, Purl 2, etc. across (***if you end on a Knit2 then when you turn, you will have to Purl those, then Knit, etc.)


Repeat these until your tail is the desired length.  I chose to keep mine short enough that it doesn't drag and he can't get the tails in his mouth to chew them.  It is up to you.  My tail is 6 inches long.  Now start your KEYHOLE.  Depending on how many stitches you cast on (20 for me) divide that number in half and only work the first (10) stitches back and forth for 10 rows.  You don't have to remove the second half, just keep them on the back of your needle. 
KEYHOLE Row 1:  Knit 2, Purl 2, Knit 2, Purl 2, Knit 2.  Turn.
KEYHOLE Row 2:  Purl 2, Knit 2, Purl 2, Knit 2, Purl 2. Turn.  Repeat Rows 1 and 2 for a total of 10 rows.  Break yarn.  Go to the stitches you left behind earlier and join yarn.  Proceed with KEYHOLE Row 1 and Row 2 for 10 rows.  Now on Row 11 continue across ALL stitches.  You just closed up your Keyhole.  Now you are going to create the body of your scarf.  This is where the size of Phydouex's neck is important.  I said his neck was 17.5" and that I was going to add 2 inches.  The 2 additional inches are for the gathers and overlap in sticking one end through the Keyhole opening so that the scarf is not too tight.


After you knit the body for your desired neck width, mine being 19.5" then lay your scarf out folded where the end should go into the keyhole and decide how long you need to knit this end to have it match up with the first tail.  You have a 6" tail and a keyhole that is 10 rows.  For mine to equal out, and with my knitting gauge, I needed to continue on for 10".  Once your ends are the same length, bind off loosely in pattern.  Ta Da!!  Poochie Scarf!


Of course, you could create this scarf for a person and the same instructions apply... =)

Monday, November 28, 2011

My 2011 Gift Exchange GIFT is in the Mail Baby!!!!

So I came across this site  http://www.craftaholicsanonymous.net/ just in time to sign up for their 2011 Handmade Gift Exchange.  You know me, I couldn't pass up the opportunity to make something!!!


I got the info and a very nice email message from my gifting partner Renee Hansen in IA and then started on my project.  I knit Renee a pair of Pedicure Socks.  I have a pair and if I got pedicures more often (ever!!) I would wear mine, certainly on COLD days like we are having now!

Here is a picture of the Pedicure Socks I put in the mail today to Renee (yes the deadline is Nov. 30, so I am NOT late!!!!)  I hope she likes them!

These were knit in Snowflake Wool Blend yarn--LIMELIGHT.  This is a 56% wool, 22% poly, 22% PTT and they are machine washable, tumble dry!  My kinda easy!

Monday, November 7, 2011

Simply Designing is giving away a BABYCAKES Donut Maker!!!

Go Here:  http://simplydesigning.blogspot.com/2011/11/babycakes-donut-maker-giveaway.html
and if you are as in love with this BabyCakes Donut Maker as I am, follow, tweet, etc. the entry requirements and you could win one!  If you do, you have to give it to me for telling you but...

This would go so well with all the other little kitchy kitchen gadgets I just HAVE to have and do actually use!

I took these pics from the Simply Designing FB page in case you don't know anything about this donut maker.  Are you droolin' yet?  Man, I am!!  Warm yummy donuts for breakfast everyday!  Well....  =)


Saturday, October 1, 2011

Amy March's Slippers by Tiny Owl Knits


Aren't these CUTE??  Do you LOVE Little Women?  Can you see Amy wearing these? 

 I needed a new pair of slippers, not really but I Wanted a new pair of slippers and I found this pattern on Ravelry.com a while back.  I bought the yarn, Lion brand Thick and Quick Wool and the US size 10 1/2" DPNs but never started on these because I just couldn't concept the cast on.  Sounds simple, "use your favorite Toe Up Sock Cast On," except I've never done Toe Up Socks.  Speed Bump.  Read further and decided that the Short Row Heel instructions were also well beyond my ability.

After staring the BeeKeeper's Quilt and learning the cast on there I remembered this pattern.  Same cast on!!  I dug out the yarn and DPNs last night after everyone was tucked in.  Up to the heel went SO fast!  Heel, another story entirely!  Never did figure it out.  I did try, I swear.  So I opted for a darted heel and did get some large-ish holes along the "dart" but these are just slippers.  Thick Wool slippers in South Central Texas.  Holes may be welcome, we'll see!!  LOL


I omitted the lace and ribbons.  While really soft, feminine, girly and just plan cute I live with 2 cats and 7 dogs.  I don't need to advertise my feet as play things!  In omitting the ribbon though I actually had to change the finishing step for these.  I picked up 8 stitches on either side between the heel and the ribbing and did a formal bind-off around.  Overall I am pleased with the outcome.  These only took a few hours to create the pair.  Not a bad Football game day project!!  The Aggies vs Razorbacks game is on the TV....11 minutes to go and I'm finished!  "Ohhhh Yeah!!!!" (Vector)  =)

Monday, September 26, 2011

Grace Ennis Argyle Chevron Clock Socks #72-109 from 1957

I admit that I will often get bored with a pair of socks long before they are completed.  I have found that if I start another pair, that I can go back and forth without getting too bored.  Since the Interlocking Diamonds socks below are so detailed I decided to start a super simple pair.  I must see/need progress and the Argyle Chevron Clock socks will be SUPER fast!

The actual pattern area on these is relatively small and not very detailed.  I'm only using one skein of the Main Color (MC) or sock body color which is Knit Picks Almond because the pattern is easily floated or carried.  I am using bobbins of Edamame and Sweet Potato.  Simple, fast, easy colorwork in nice warm Autumn colors. 

Close up of the little bitty argyles on either side of the leg. 

Since this sock's detail or pattern ends well before the heel flap starts I can cheat (shhh) and start knitting in the round after turning the heel.  Even though the pattern dictates knitting the instep flat I have found these move along much faster in the round.  Not authentic but the end result looks the same in 1/3 the time.

Also, I found a pattern on Ebay this weekend that I needed for my collection.  YAY!  Only 12 more to go to have them ALL!!  This one looks very wrinkled with some deep fold creases but hopefully all is good when it arrives!! 
#7204  Diamond Overlay Socks from 1949

Monday, September 19, 2011

Grace Ennis Graphic Knitting Patterns Interlocking Diamonds Socks, #7268 from 1954

I've been working SO hard on my HexiPuff quilt and popping those little puffs out 1 about every 35 minutes or so but I really needed to get back to my socks.  I looked at my stash of sock yarn to see what colors/color combos I could come up with (I CANNOT buy any more yarn!) and decided I would Cast On the Interlocking Diamonds socks.

I have all the colors listed in the pattern albeit my yellow is Semolina and not bright yellow but I like the colors together and that's all that matters.  I cast on while watching The Lost Room in my little craft area last night and got just past the ribbing before calling it a night.  More to come, these really do knit up quickly, it's the second sock that takes so long!  I suffer from Second Sock Syndrome for sure!! 


Leg complete as well as instep.  Now to stitch up the back leg seam, work the reinforced heel, gusset and foot so I can then stitch up the foot and the instep.  The toe will be worked in the round.

It is even Bee-utiful on the back because no stitches were carried but done using bobbins of color.

Since the design on this particular sock travels down the instep, you have to knit the instep and heel/sole areas separately then join the two using the mattress stitch. 


Thursday, September 15, 2011

OMG!! The EASIEST Ice Cream EVER!!

I saw this Homemade Ice Cream, No Machine, 2 ingredients recipe on a blog that I follow the other day.  Right!  Homemade ice cream with no machine, ok that is the one where your kids are suppose to roll a coffee can around for like, hours.  AND, just 2 ingredients, again--Right...

It sounds too easy and fast to pass up the opportunity to disprove it so I caved and started on my "ice cream", Right...

This recipe came from Kevin & Amanda's blog, click on their button over on my sidebar to see more. The base is just 2 ingredients. 2 cups of Heavy Cream and 1 (14 oz) can of Sweetened Condensed Milk. Easy enough so far, huh? You will need to whip the cream till stiff peaks form and any little extras, flavorings, etc. you mix into the Sweetened Condensed Milk which you then, gently fold into the Whipped Cream being careful not to deflate it too much. Put in a container and freeze for 6 hours.

I decided to make "Cinnamon Roll" Ice Cream.
(make sure you set things upright or they will spill, stupid laptop!!)
2 Cups Heavy Whipping Cream
1 (14 oz) can Sweetened Condensed Milk
3 Tablespoons melted butter
1/2 teaspoon cinnamon
1/2 teaspoon vanilla
3 Tablespoons chopped pecans


Except for the Freezing part of this recipe, the beating the cream takes the longest!  To speed this step up some, put your beaters and bowl in the freezer for 20 minutes before hand.

Sweetened Condensed Milk mixed with melted butter, cinnamon and vanilla.

Getting there, COME ON!!

Done!

Gently fold  the Sweetened Condensed Milk mix into the whipped cream.

Put in container and freeze for 6 hours.

I don't know how this will turn out after the 6 hours but the concoction was YUMMO!  The dogs didn't get to lick these bowls/beaters at all, they were MINE!    We should come up with other flavor combos!  Easy enough and cheap too, let's do that!  Link your flavor combo recipe here!

Wednesday, September 14, 2011

Finding other uses for those scrapbooking supplies/tools

This is my Boss's chair.  He popped the little button off, probably with his pocket seam but he just can't stand the way it looks.  He wanted me to fix it.  How?  Why does he think I am capable of repairing his chair?  I let it go and he didn't bring it up again until last week (granted he has been in Colorado since May but still) so this must REALLY bother him. 

I remembered my Imaginisce I-Top brad maker.


I brought all the goodies up to the office today and my Medium Brad Daddies are excatly the same size as his chair button!  Viola, new chair button!!! 

I haven't quite decided how to attach it to the chair and make it secure but that will come too!  Robin and Candice have both said (more than once) that I have one of everything craft related and that simply isn't true but my little tool/gadget stash came in handy today even if it wasn't for scrapbooking!!  =)

Knooking, all the time, sigh....

So, I just HAD to get the Knook Kit and I just HAD to start, rip out, start over, rip out....until I finally got - it finally clicked! Now what have I been doing? Yep, KNOOKING! The kit came with 3 knooks or modified crochet hooks and 3 satin cords or rat's tail. The knooks are a size G or 6, an H or 8, and an I or 9. These are all much larger than I use and require worsted weight yarns which I have a ton of, I just don't make anything with it? Right, I know, most of it was given to me by a dear friend who no longer had the time to knit because of work, school and kiddo.

So, I start knooking a Hexipuff like I've been making on size 3 needles with sock yarn to "patch" together and create a "quilt" but the puffs were so much larger that I decided to create a baby size blanket for my buddy Robin's little girl Madison Marie. I will need 600 or so for my quilt but not so many for her's! Here is what I have so far! It is already 21" and the stem isn't as long as I want it. A row or row .5 of green, the pink flower and a blue background (sky)with little duplicate stitch white fluffy clouds floating around. I also chose not to stuff these puffs with polyfill mainly because of the size but also---Texas---don't need a double thick blanket stuffed with polyfill, ever...


Then I decided to put the flower blanket down and try a pair of socks which are my true love anyway.  Knooking in the round didn't come to me right away.  I had to try several different times before I managed to get the cuff to work.  Again, since these needles/hooks are so much larger and require thicker yarn I chose a sleep sock or slipper sock pattern from Ravelry.com  -(click here for pattern) Moonlight SlipperSocks. I've knit these before and they are really quick even with the little bit of intarsia on the ankle/leg and heel.  I've never tried to add a second color in while knooking (yet!) so I omitted the colorwork and will go back after all is complete adding them back in via duplicate stitch.  I chose these initially because of the little crescent moon on the heel so..

These are anklettes or short socks so here is the cuff, leg and most of the heel flap from behind.

This is the front with the heel flap worked.  The instep stitches are on a knitting needle waiting while the heel is being made, I'm not cheating, I swear!!

I'll keep you posted with my progress.  I did all of the above while watching TV last night so still faster than knitting! 

Heel Flap completed and Heel Turned.

See the nice little cup the turned heel creates?  I actually did create the Turned Heel and not a short row.  I had to incorporate 2 other cords (I used scrap yarn) to use the knook as intended and I didn't take a picture but since I do NOT know anything about a short row heel I decided to fiddle with the knook and do what I knew rather than try and learn something else on top of.  Worked just fine.

All stitches picked up along the side of the heel flap.  Knitting these will create the Gusset.

ALL stitches picked up, first row knit and everything sitting nicely on the knooking cord.  I've tied little pieces of  yarn in a different color at what would be the beginning of each needle when knitting these.  To form the gusset or the little triangle right under your ankle bone you must decrease at the end of the needle every other row so I need this marker to let me know where to put my decreases.  Also, there is a marker in the middle of the heel which is now the very beginning of the sock.

Folded flat you can see the different sections of this sock so far.  The top or Cuff, the leg section (very short on these anklettes) the heel flap, the heel and the instep.  Now to create the Gusset and in doing so the foot then on to the toe.

 Now to FrankenNeedle me a crochet hook small enough for my Grace Ennis Socks and I'm set!!  I did find a set of interchangeable Crochet Hooks called Symfonie Interchangeable Tunisian Crochet Hooks in a rainbow wood finish with the Sock size hooks but they are not sold in the US and so far I haven't found an outlet willing to mail them to me.  =(   There's always Ebay!!

Thursday, September 8, 2011

Ugh!!! Something NEW to learn! Do you know about KNOOKING?

I'm a member of several groups on Ravelry and I do participate when the topic is of interest to me.  Otherwise I tend to lurk and move on.  There has been talk of "Knooking" lately but that word doesn't mean anything to me so I moved on. Well, it continues to pop up and today Leisure Arts offered a Free Amigurumi Piggy pattern so I clicked.  Amigurumi is, for anyone who doesn't know, small knitted toys/dolls of Japanese origin.  They are often crocheted and done so in the round.  Recently there have been many patterns created for knitting them instead.

 Knooking is Knitting using Crochet Hooks!  WHAT?  Take a look, now there's something new I NEED to learn and I just have to have that KIT!!! 

If you’ve been wanting to knit but always felt awkward holding those big
long needles, now you can conquer knitting with a special crochet hook called
The Knook. These bamboo hooks look like regular crochet hooks on one end but

have a hole in the other end for connecting a silky cord to hold your stitches.
Everything you need for learning is in a beginner kit that comes with Knooks in
three sizes (G-4 mm, H-5 mm and I-5.5 mm), three 36-inch cords, and a pocketsize
instruction book with 4 beginner projects. LeisureArts.com has free how-to
videos (with general instructions both for left-handers and right-handers) and
additional patterns.
 
Here is the Freebie Pig pattern that you can get from the Leisure Arts Blog.  Isn't this the CUTEST stinkin' Piggy?  Gah!
 
Click for the pattern! HERE

and here is what the KIT looks like.  Says it's available at Wal-nart (Dang, I don't even have to wait for it....)

Wednesday, September 7, 2011

The MOST AWESOME Ebay find EVER!! Grace Ennis Binder

I'm an Ebay pro and I will admit that without shame (much).  I can usually find the things I want even if the seller hasn't used the typical keywords.  Like the last Grace Ennis sock patterns I found were listed as "Vintage 1949 Litho Sheet Knitting Socks" so not my usual search terms for GE patterns.  They were ones I didn't have and I was excited!  These are not in the best condition but I can't wait for them to come in as I am getting ever closer to having them ALL!!

Well, the other day I came across a seller who had listed the Boston Terrier and the German Shepherd, both of which I didn't have and in corresponding with her found out that she had a "ton more to be listed."  I was over the moon!  I asked if she would tell me which ones, she said basically "no", blah, blah but in the end she said she had an original Grace Ennis Binder with old page protectors, a list of all Grace Ennis sock patterns as well as color pictures of many!  That was going to be mine!  It came in last night and I LOVE it!!!!


Across the very bottom there is reads, "Patterns at Yarn Stores everywhere or order direct from Grace Ennis P.O. Box 49-908, Los Angeles 49, California.  Please remit with order at 25c per pattern plus 4c to cover mailing (4c covers 1 to 3 patterns).  No COD's. 

Now I have a complete list and can actually look for specific patterns.  This binder was printed up before she published a few patterns though because the list ends with patterns # 72-113 (which I do not have) and I have # 72-114 - 72-116.